Purpose of the app
The Collect + Go application is a digital solution that streamlines the process of obtaining signatures for e-CMRs, replacing the traditional paper-based approach. This application is designed to be user-friendly, requiring only a smartphone or tablet for utilisation. It offers a comprehensive solution for transport companies with multiple delivery addresses, significantly enhancing operational efficiency. The application's interface is intuitive, requiring minimal change from both the sender and recipient. Instead of receiving a paper version, the sending and receiving parties will receive a copy of the signed e-CMR via e-mail. This makes working with the collect + go app user-friendly with a low threshold for implementation.
The app is available for IOS in the Apple app store and for android in the Google play store.
Logging in
The app is designed to be user-friendly, with a simple login process. Your administrator will create a driver account for you, granting full access to all app features. You can log in using the credentials provided by your administrator or by scanning your personal QR code, provided by your administrator.
Note: If you are still experimenting in the staging environment, make sure to turn on the Staging Environment switch on the login screen. If this switch is not enabled, the app will not function correctly in staging mode.

The app is primarily designed for drivers. While it is possible to log in with other user profiles, certain key functionalities, such as signing e-CMR's, may not be available. For detailed information on user creation and permissions associated with each user type, please refer to the help page in the Collect + Go portal.
General tour of the Collect + Go app
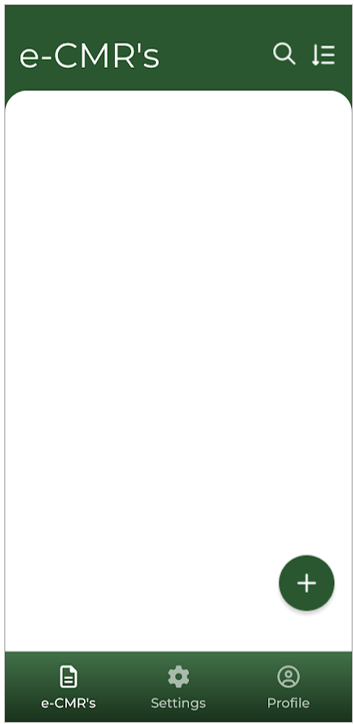
When logged into the app, the following screen will appear:
![]()
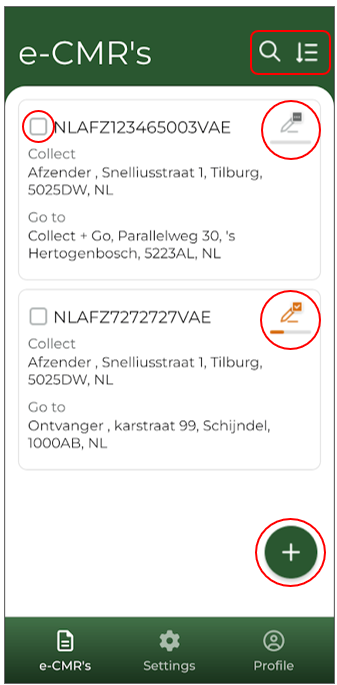
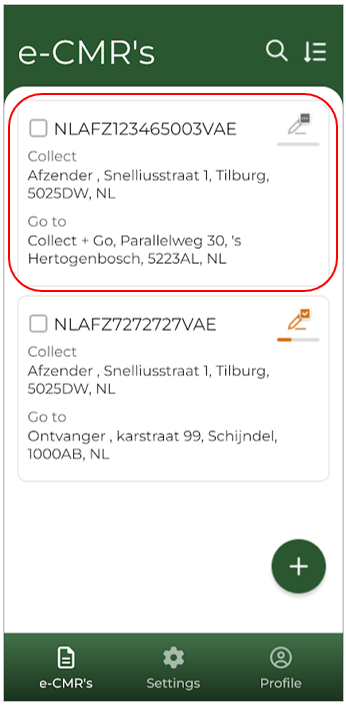
e-CMR Tab:
This screen displays the relevant e-CMRs assigned to you as a driver.
- At the top, you will find the e-CMR code.
- Below that, the pick-up and delivery addresses of the goods are shown.
- By default, only e-CMRs assigned to you will be visible.
- The e-CMRs are listed in chronological order, with the most recent at the top.
- To keep the list manageable, only e-CMRs relevant to the next five days will be displayed.
e-CMR Tab:
Home Screen Overview:
This is the application's home screen, where all available e-CMRs are displayed. By selecting an e-CMR, you can open it and proceed with the signing process. Detailed instructions on signing will be provided later.
e-CMR Status Indicators:
The pen icons on this screen indicate the status of each e-CMR. For example, the top e-CMR has not yet been signed by any of the three parties. In contrast, the second e-CMR has been signed by the sender, changing the icon's colour and updating the status bar to 1/3.
Create e-CMRs:
The plus (+) icon allows you to manually create a new e-CMR. This feature is not available by default. If you are interested, please contact Collect + Go for more information.
Search and Filter:
At the top of the screen, you will find search and filter options. These features enable you to quickly locate specific e-CMRs.
Bulk Actions:
Using the checkboxes, you can manage multiple e-CMRs simultaneously. The checkboxes also provide access to register loading and unloading times through the Collect + Go app.
Note: Bulk actions can only be performed on e-CMRs that share the same status. This means that a bulk action cannot be applied if, for example, one e-CMR has already been signed by the sender while another remains unsigned.
Settings Tab:
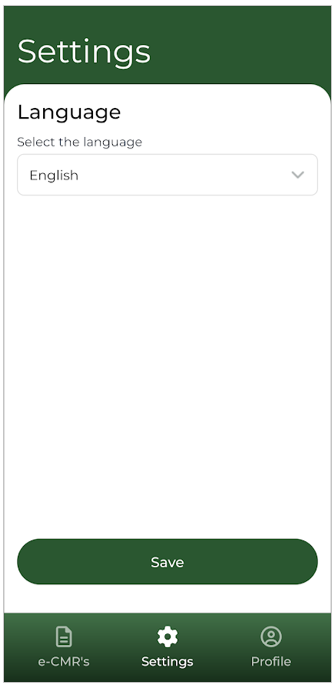
In the "Settings" tab, you can change the app's language. By default, the language is set to the user's preferred language as configured in the portal.
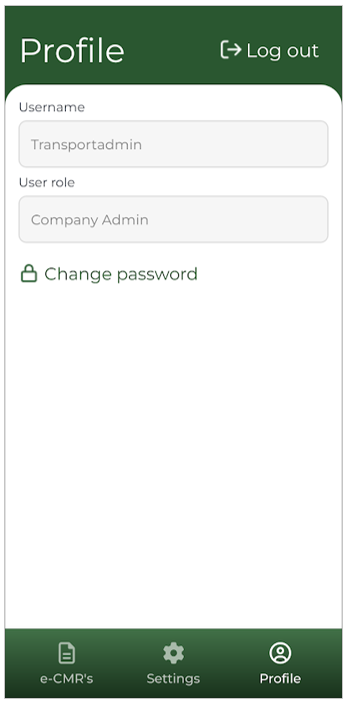
Profile Tab:
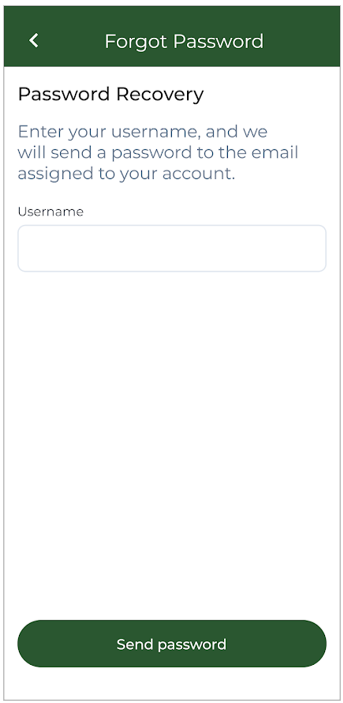
The Profile tab allows you to view your profile details. You can also request a new password from this tab.
General explanation of how to sign an e-CMR in the application as a shipper, carrier and receiver
General explanation of how signing an e-CMR works in the app.
Select the Desired e-CMR
Tap on the e-CMR you wish to view or update.
e-CMR Details Screen
The details of the selected e-CMR will be displayed on this screen. Here, you can:
- View the details of the e-CMR.
- Add return goods or photos.
- Edit the current goods listed on the e-CMR.
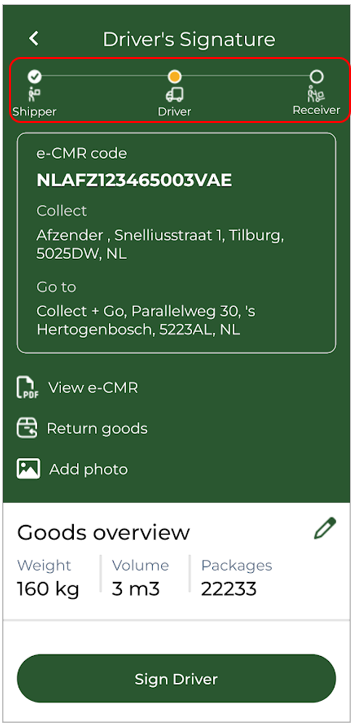
For more information on how to handle exceptions, refer to the relevant FAQs on this page. When the information is verified and the shipper is ready to sign, click the "Sign Shipper" button at the bottom of the screen.
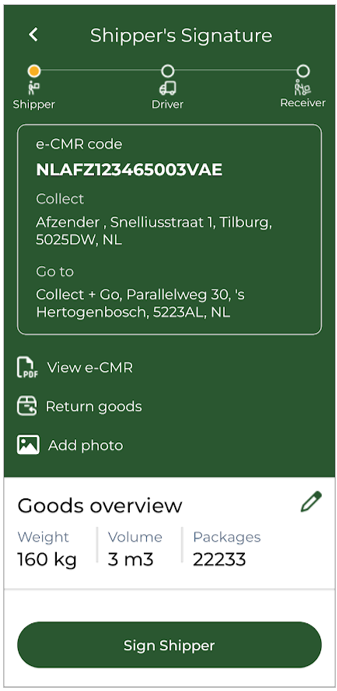
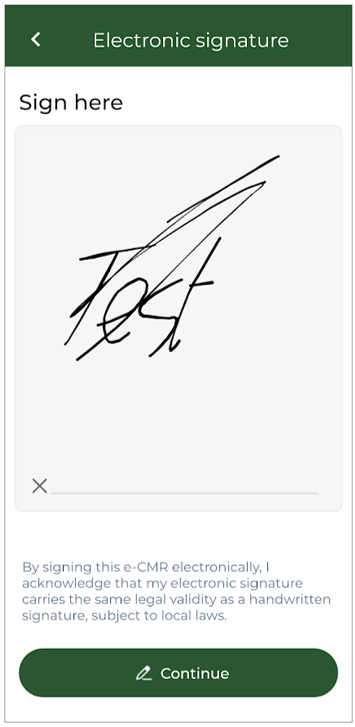
Shipper Signature Screen
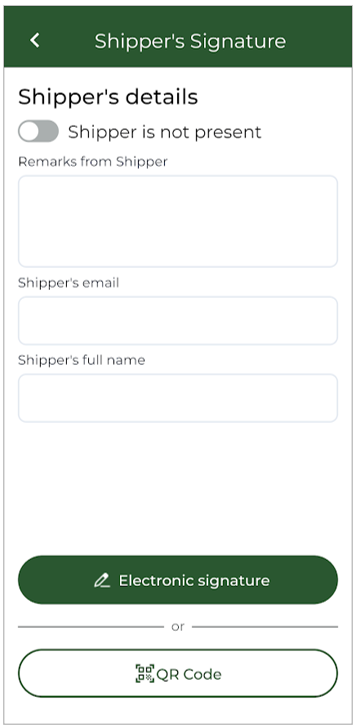
- This screen allows you to add comments, enter the sender's email address and name. In most cases, the email address is already known and does not need to be entered manually. Additionally, this field is optional and not required to proceed.
- If the sender is not present at the time of collection, this can be indicated using the button at the top of the screen. The signature box will automatically note that the sender was not present.
- The e-CMR can be signed in one of two ways:
- Sign on Glass: The sender signs directly on the driver’s device.
- QR Code: If the sender has a pre-generated QR code (created in the Collect + Go portal), it can be scanned to represent their signature. This method is ideal for recurring customers but must be arranged in advance.
Once the signature method is selected, follow the on-screen instructions to complete the process.
Shipper Signs the e-CMR
The sender signs the e-CMR on the driver’s device. After confirming the signature, the e-CMR is officially signed by the sender.
Return to the e-CMR Screen
Once the sender’s signature is completed, the app will automatically return to the home screen (e-CMR overview tab). If you select the same e-CMR again, the updated status bar will indicate that the sender has signed. At this stage, the driver can proceed to sign the e-CMR. It is no longer possible to modify the goods, as the sender has already signed. However, the driver still has the option to add return goods if necessary. Since the signing process for the driver is identical to that of the sender, these steps are not repeated here.
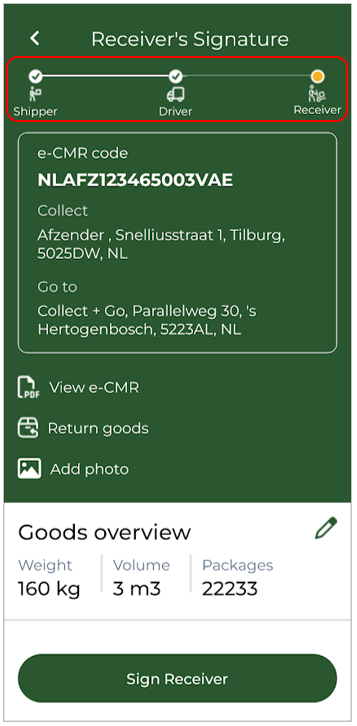
Receiver’s signature
After the driver has signed the e-CMR, the receiver is prompted to sign. The progress of the e-CMR is displayed on the status bar at the top of the screen. The signing process for the receiver is the same as the previous steps and will not be explained further.
Completion of the e-CMR
Once the recipient signs the e-CMR, it is considered settled and closed. The e-CMR will no longer appear on the home screen.
Viewing Closed e-CMRs
To view a closed e-CMR, click the magnifying glass icon at the top of the home screen. Check the box for "Closed e-CMR", and the closed e-CMR will reappear on the home screen.
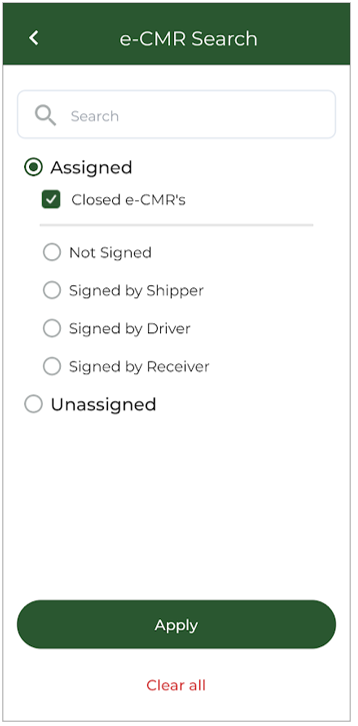
How to find and select the desired e-CMR
Default settings:
- By default, only e-CMRs assigned to you will be visible.
- The e-CMRs are listed in chronological order, with the most recent at the top.
- To keep the list manageable, only e-CMRs relevant to the next five days will be displayed.
On the home page, two buttons provide options for searching and sorting e-CMRs. The magnifying glass icon offers several search options. For example, the search bar allows for a direct search by e-CMR code. Additionally, you can filter e-CMRs by their status, such as retrieving closed e-CMRs or searching for those that have already been signed by the sender.
By default, only e-CMRs assigned to you are displayed. However, you can also search for e-CMRs that are not assigned to you:
- Click on "Unassigned".
- Enter the exact e-CMR code in the search bar.
This function allows you to find unassigned e-CMRs, but only those linked to your own organisation.
The other filter button on the home page allows users to sort e-CMRs in a specific order.
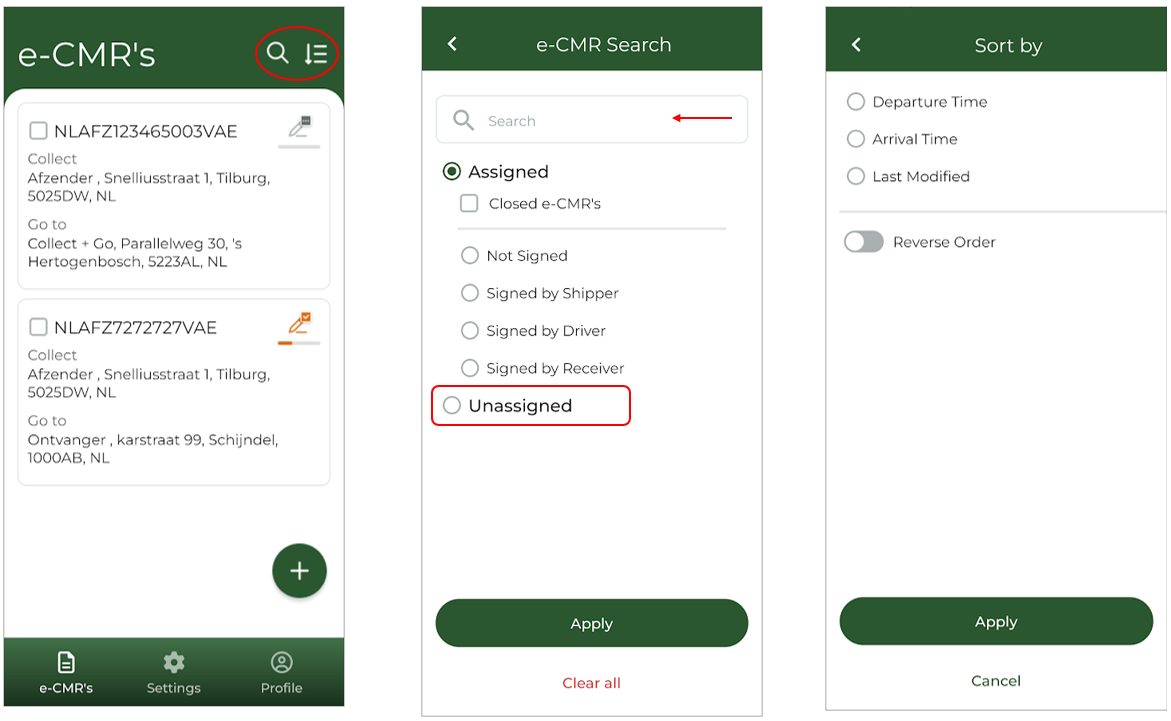
How to view the e-CMR PDF File
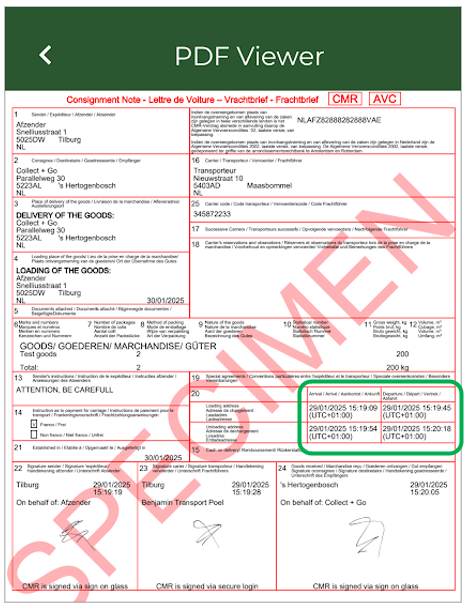
The app allows you to view the PDF version of the e-CMR, which may be useful in the case of an inspection. The PDF displays all the details of the goods, along with any signatures already made by the shipper and driver. The PDF file will always be the most recent version of the e-CMR. So it is not possible to still see the PDF without signatures if they have already been set.
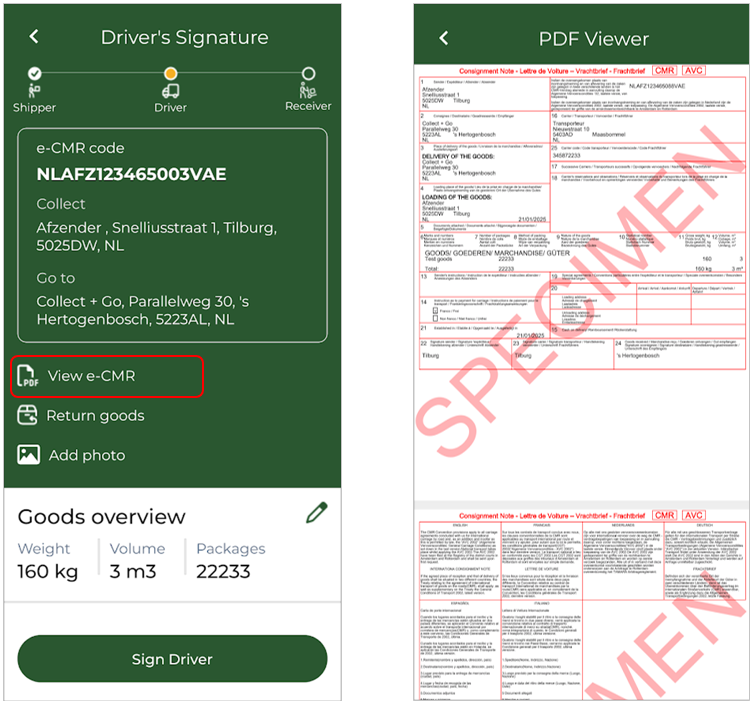
How to add return goods
Adding Returns to the e-CMR
It is possible to add return goods to the e-CMR. You can specify which return goods are loaded or unloaded at the pick-up location and do the same for the delivery location. These are additional goods that are recorded as extra entries on the e-CMR.
If no signatures have been added yet, return goods can be registered for both the pick-up and delivery locations. However, once the sender has signed the document, return goods can only be added for the delivery location.
The process for adding return goods is as follows:
- Click the plus (+) button.
- Specify the return goods to be loaded at the pick-up location.
- Indicate the quantity of return goods. You can enter any unit in this field, such as kilograms, the number of packages, pallets, etc.
- Click Save.
- When unloading these return goods at the delivery location, register them again under the delivery location. This time, select "Unloaded" instead of "Loaded.
Note: In most cases, predefined return types are already available. There is no need to create them manually using the plus icon. Instead, you can simply select the appropriate option from the list.
Example Scenario:
In addition to the goods listed on the e-CMR, three empty pallets must be collected at the pick-up location. These pallets must also be delivered to the delivery location, just like the goods listed on the e-CMR.
What to fill in:
- Pick-up: "Loaded" -> 3 pallets
- Delivery: "Unloaded" -> 3 pallets
How to add photos
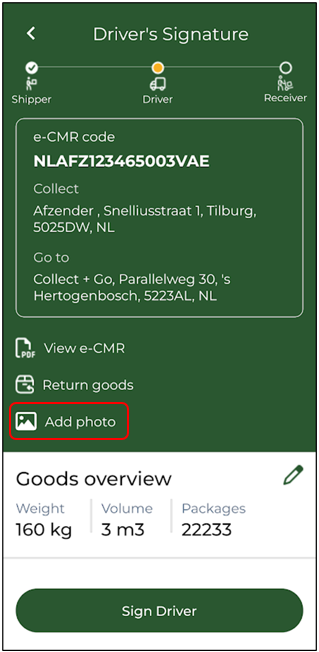
The e-CMR application allows you to add photos directly to the document. By clicking on “Add Photo,” you can take a picture instantly using your device. Please note that it is not possible to upload a photo that was previously saved on your device. Adding photos after the recipient's signature is also not possible
How to modify and add goods
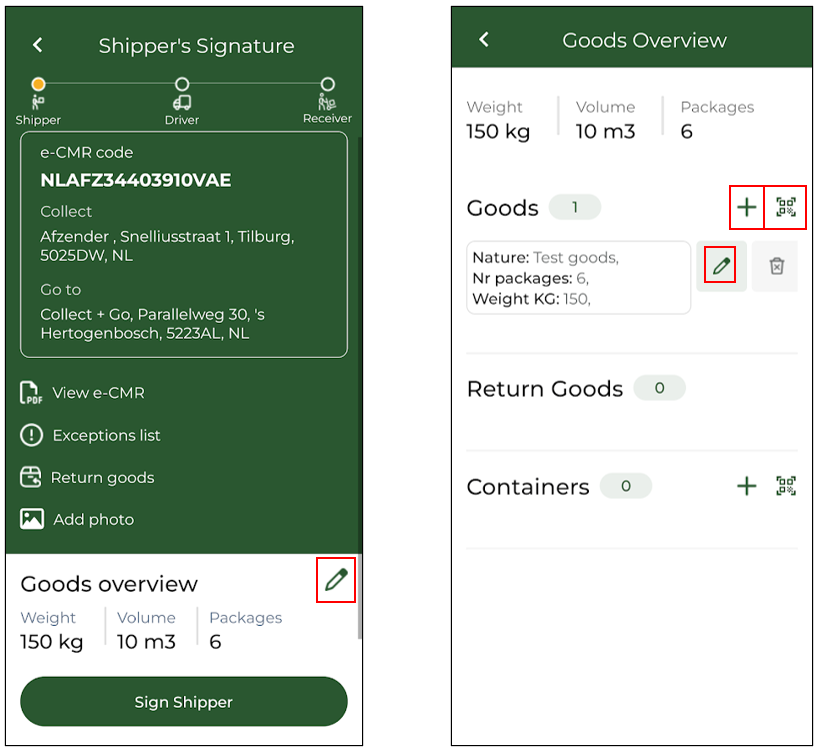
Modifying Goods in the e-CMR
It is possible to modify existing goods in the e-CMR, but only if no signatures have been collected yet.
Steps to Modify or Add Goods:
- Click on the pen icon on the e-CMR page. This will open the Goods Overview screen.
- In this screen, you can view the details of the goods and modify them by clicking on the pen icon.
- To add new goods, click the + icon or scan the QR code on the goods.
- Goods can also be loaded via QR code scanning, which is available on this page.
- For general goods, this is a standard option.
- For return goods, this function must be enabled in advance, as it is not available by default.
- If activated, the QR button will appear in the same place as for general goods.
Mandatory Fields
When adding or modifying goods, not all fields are required. However, the following fields are always mandatory:
- Goods description
- Weight OR Volume
How to sign an e-CMR using a QR code
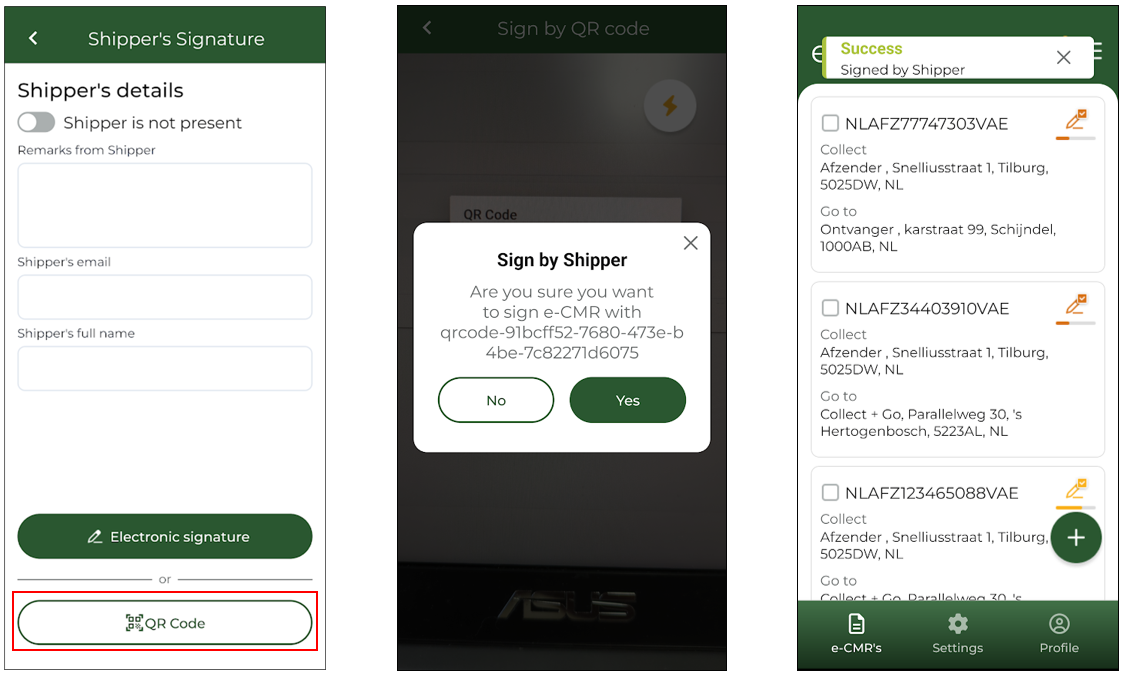
In addition to the Sign on Glass method, an e-CMR can also be signed using a QR code via Collect + Go. This is a simple and secure way to sign an e-CMR.
If you arrive at a sender or receiver who uses this method, follow these steps to sign the e-CMR:
- Click on "Sign Sender/Receiver".
- Select "QR Code".
- Scan the QR code.
- Confirm to sign.
- The e-CMR is now signed via QR code.
Important Notes:
- This signing method only works if the data in the QR code matches and links to the designated organization for this signing step.
- When using this method, a predefined signature will be applied to the e-CMR.
- It is also possible for a driver to sign using a QR code. To enable this, contact your company admin, who can provide a QR code that can be placed in your truck.
How to use the exceptions list
Watch the video or use the written instructions down below.
Handling Damaged or Lost Goods – Using the Exceptions List
It may happen that goods get damaged, lost, or experience other issues. In such cases, you can use the Exceptions List option.
⚠ Note: This option is only available if your admin has activated this feature for you. If this is not the case, you can leave remarks about damaged or lost goods in the Remarks field before signing.
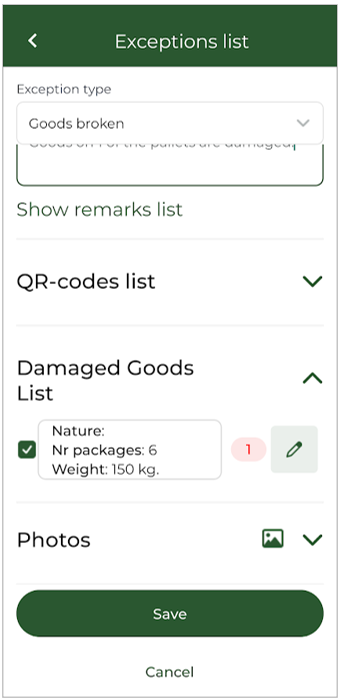
Steps to use the Exceptions List:
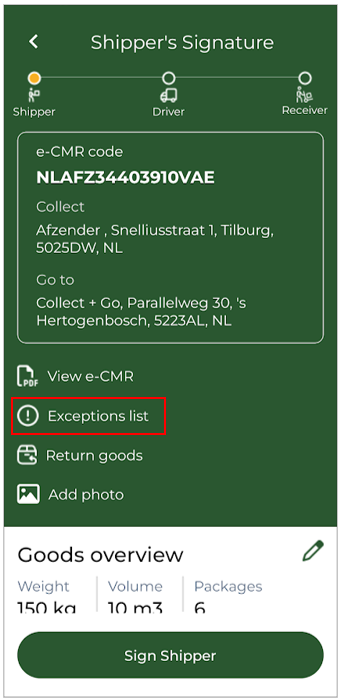
1. Click on "Exceptions List".
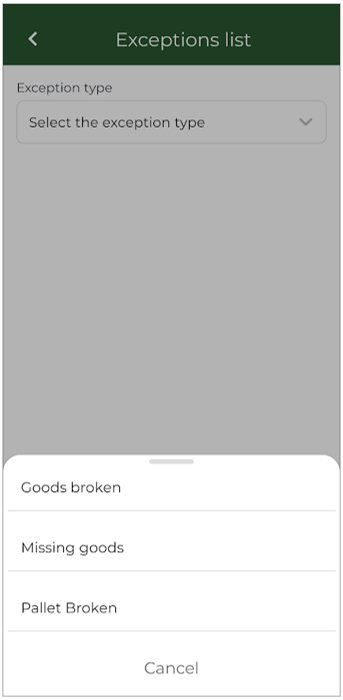
2. Select the relevant issue. These are predefined options. If none of the options apply to the situation, you can still leave a remark in the Remarks field before signing.
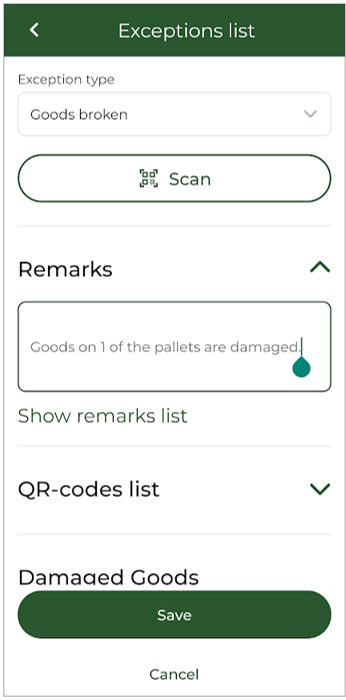
3. Use the scan function (if applicable). This allows you to easily specify which goods are affected.
4. Provide additional details in the "Remarks" field.
5. Check the "QR Code List". This gives an overview of all scanned QR codes.
6. Manually enter affected goods in the "Damaged Goods List". If you did not use the QR scanning function, you can manually specify which goods are affected and in what quantity.
7. Add photos for clarification (if necessary).
8. Click "Save".
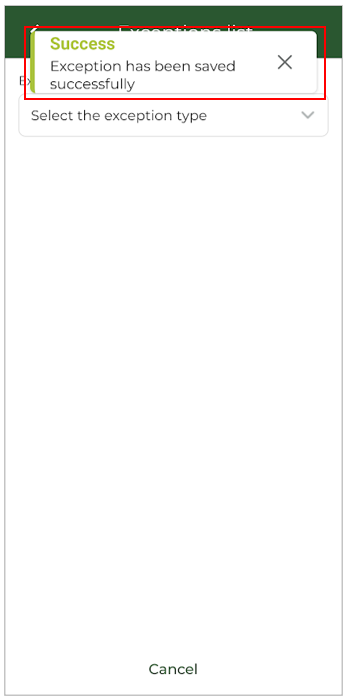
⚠ Important:
Remarks made through the Exceptions List cannot be edited or reversed. Once submitted, they are immediately recorded on the e-CMR and cannot be changed. Changes made via the Exceptions List will not be reflected in the goods overview in the app. To review the changes, refer to the PDF version of the e-CMR, which is accessible through the app.
How to manually create an e-CMR in the app
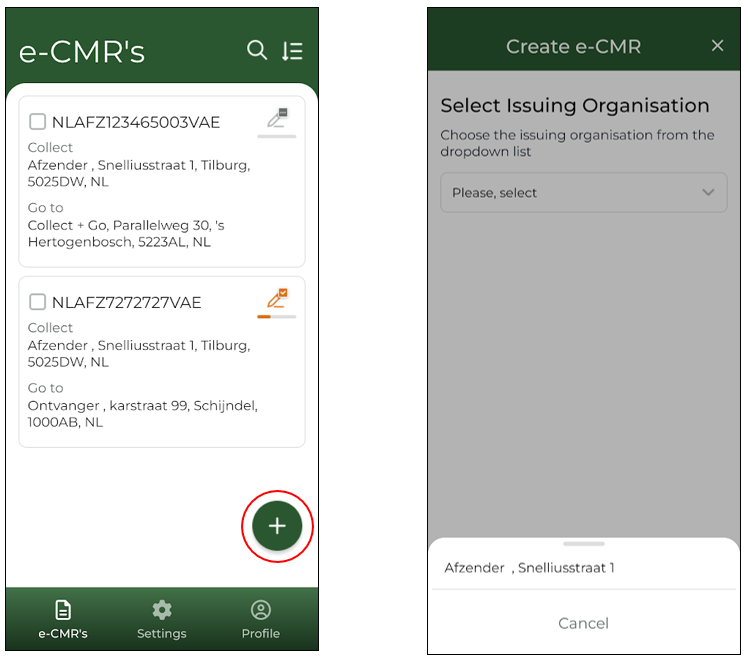
It is possible to manually create an e-CMR in the app. To do so, click the large round plus button at the bottom left of the e-CMR overview screen. Clicking this button will take you to the next page. Here, select the issuing organisation, which is the entity on whose behalf the e-CMR is being created. This party is considered the "owner" of the e-CMR. Once the correct organisation has been selected, the e-CMR can be composed. Follow the further steps outlined in this FAQ page.
Note: e-CMRs can only be created for companies that have granted prior authorisation. This is why a dropdown menu is used. If a company does not appear in the list, it is not possible to create an e-CMR for that company. In this case, only one company has granted this user the rights to manually create an e-CMR on their behalf. This is why only one company appears in the selection menu.
The issuing organisation can be the sender, the transport company, or the recipient.
Step 1 - Define addresses
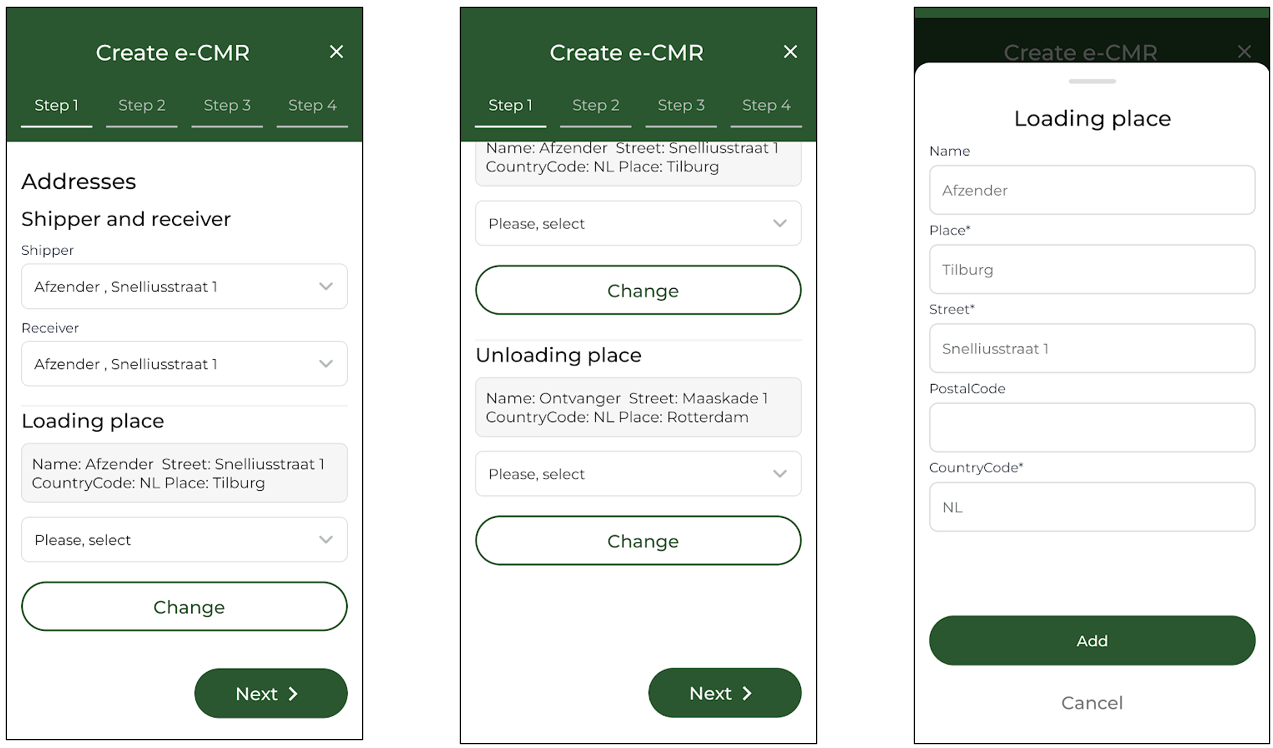
After selecting the issuing organisation, the pickup and delivery addresses must be specified. By entering the correct sender and recipient, the corresponding address will automatically be assigned based on the selected sender and recipient. If the address differs from the pre-set address, it can be adjusted by clicking the Change button or selecting another pre-set address from the dropdown menu. Click Next if the addresses are correct.
Step 2 - Add goods
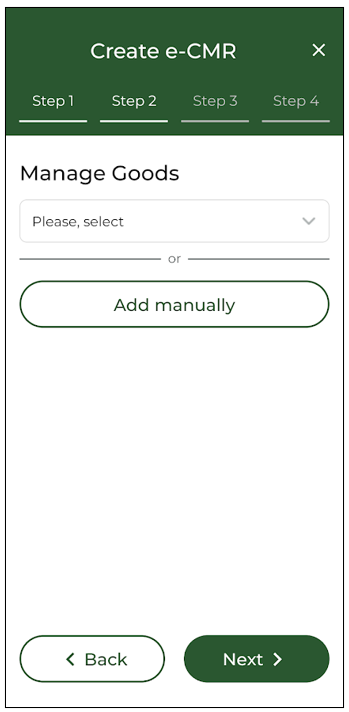
In Step 2, goods can be added. In some cases, the issuing organisation will have pre-set goods available, which can be selected from the list. This can be useful when the same types of goods are frequently transported. If the required goods are not listed, they can be added manually. This process is the same as adding goods to an existing e-CMR—refer to the FAQ entry "How to modify or add goods" for more details.
Important: A description of the goods and either the weight or volume are mandatory fields.
Step 3 - Add return goods
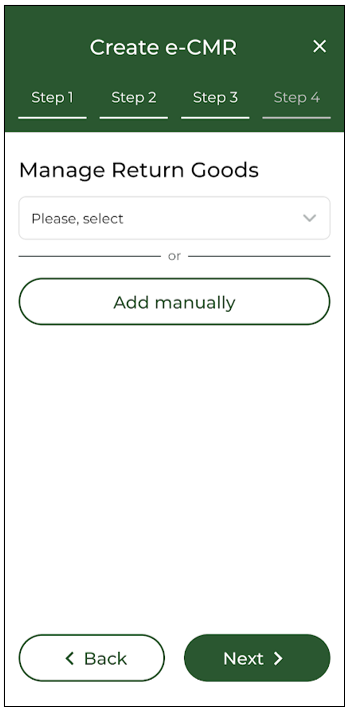
Step 3 provides the option to add return goods. This is optional. Adding return goods follows the same process as adding regular goods. It is also possible to add only return goods without selecting any "normal" goods. However, an e-CMR cannot be created without goods, so at least one of the two must be entered.
Step 4 - Pick up and delivery time
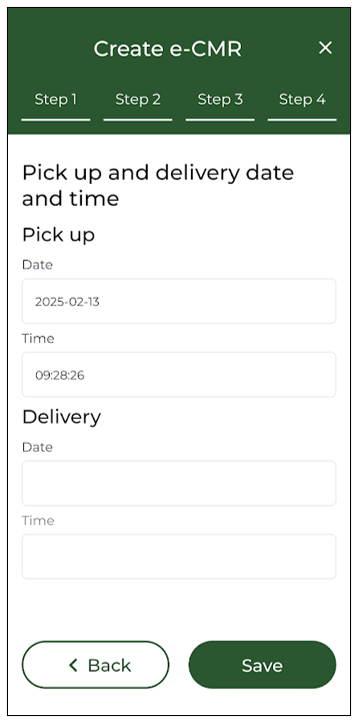
In Step 4, the pickup and delivery times must be specified. These times are used to arrange the e-CMRs in the correct order on the overview screen. The times will not be displayed on the e-CMR itself, so it is not an issue if the exact time is not yet known—an estimate is sufficient.
Why can I not create an e-CMR in the app?
This is most likely because you are not authorised by other organisations to create an e-CMR. Creating an e-CMR on behalf of other companies is only possible if they have granted you access. If this is not the case, an e-CMR cannot be created. Please contact Collect + Go for more information.
Who is the issuing organisation?
The issuing organisation is the entity on whose behalf the e-CMR is issued. In essence, this organisation is the owner of the e-CMR. In many cases, the issuing organisation initiates the creation of the e-CMR and arranges the transport.
I just created an e-CMR in the app but it is not visible, how is this possible?
There are two possible reasons for this situation:
- Future Date Selection – The date you selected when creating the e-CMR may be far in the future. As a result, the newly created e-CMR might not immediately appear in the overview, especially if there are many other e-CMRs with earlier dates. You can use the filter functions to locate your e-CMR. As the selected date approaches, the e-CMR will automatically appear at the top of the overview screen.
- Incomplete Information – If the goods or address details are not correctly entered, you may receive a confirmation that the e-CMR was created, but it will not appear in the overview. If you still cannot find the e-CMR after applying filters, it is likely that some essential details were missing or incorrect during the entry process. An e-CMR cannot be successfully created without complete and accurate information. In this case, you will need to create the e-CMR again, ensuring all required details are correctly filled in.
I want to create an e-CMR just for return goods, is this possible?
Yes, it is possible to create an e-CMR with just return goods.
How to find an e-CMR that is closed

You can view closed e-CMRs in the application. To do so, click on the magnifying glass icon. A menu will appear. In this menu, select “Closed e-CMRs.” The closed e-CMRs will then be displayed on your screen.
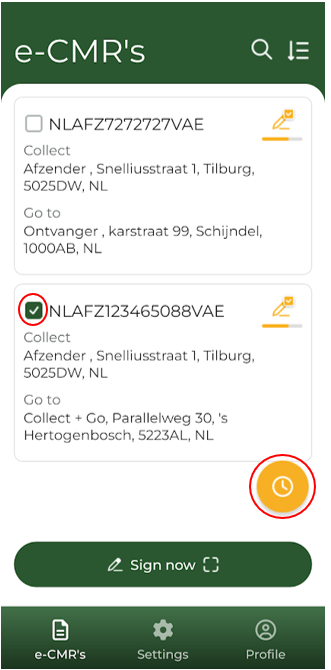
Register loading and unloading times in the app
Watch the video below or read the written instructions about this topic.
Register Loading and Unloading times in the App
The app allows you to register loading and unloading times directly on the e-CMR. Follow these steps:
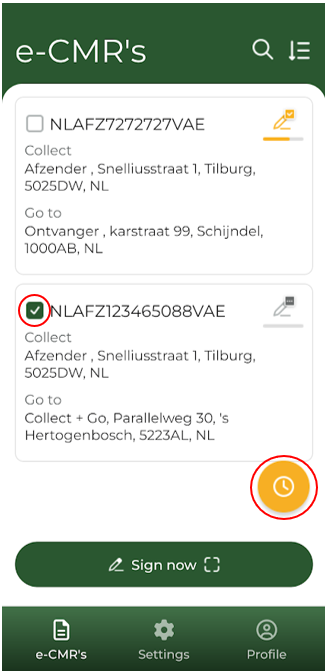
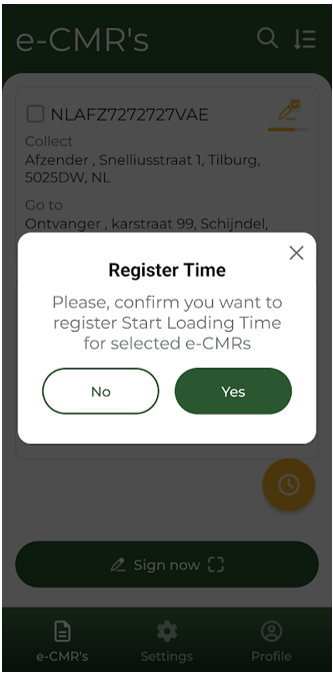
Start the Loading Time Registration:
- Click on the box next to the e-CMR code. A yellow clock icon will appear on the screen.
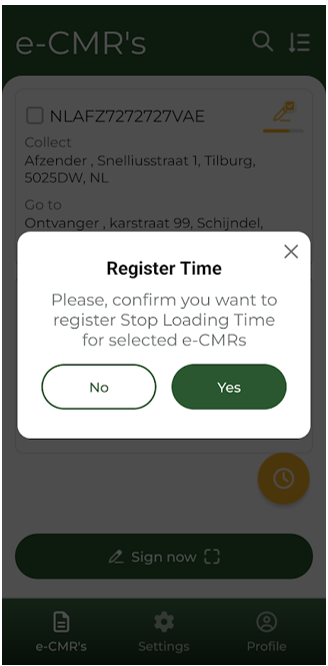
- Click on the yellow clock to begin the loading time registration. A pop-up will appear; click “Yes” to confirm the time registration
Collect Signatures:
- Collect both the sender’s and driver’s signatures.
- Once the signatures are collected, stop the loading time registration by repeating the same steps: click on the box next to the e-CMR code, then on the yellow clock, and confirm.
Start the Unloading Time Registration:
- Upon arrival at the delivery location, start the unloading time registration by following the same process: click on the box next to the e-CMR code, then on the yellow clock, and confirm the time registration.
- Important: Start the unloading registration before collecting the receiver’s signature.
Stop the Unloading Time Registration:
- After unloading the goods and collecting the receiver’s signature, stop the unloading time registration. This ensures the exact unloading duration is recorded.
Confirmation and Recording:
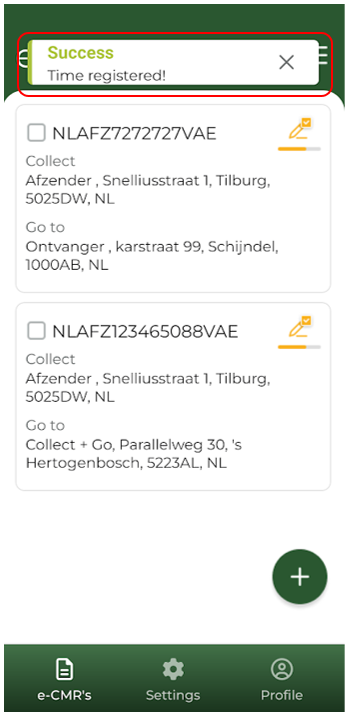
- A pop-up message will confirm that the loading or unloading time has been successfully registered
- The recorded times will be automatically added to the e-CMR in Field 20.
Important Notes:
- Ensure the loading time registration is started before collecting the sender’s signature. It is not possible to start the registration after the sender has already signed.
- Similarly, start the unloading time registration before the receiver’s signature is collected.
- If an attempt is made to start the registration in the wrong state of the e-CMR, the app will display an error message.
How to change the language
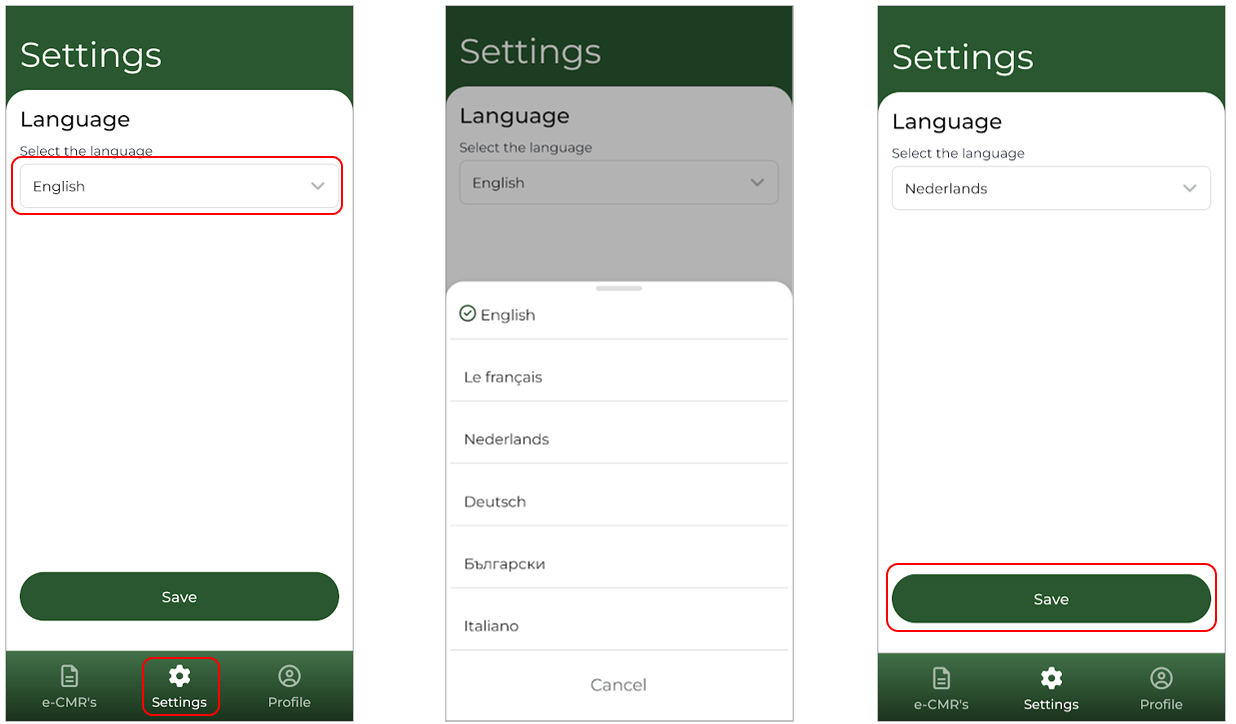
Changing the App Language
- Navigate to the Settings tab at the bottom of the screen.
- Select your preferred language.
- Click Save to apply the changes.
The app will now display in your chosen language.
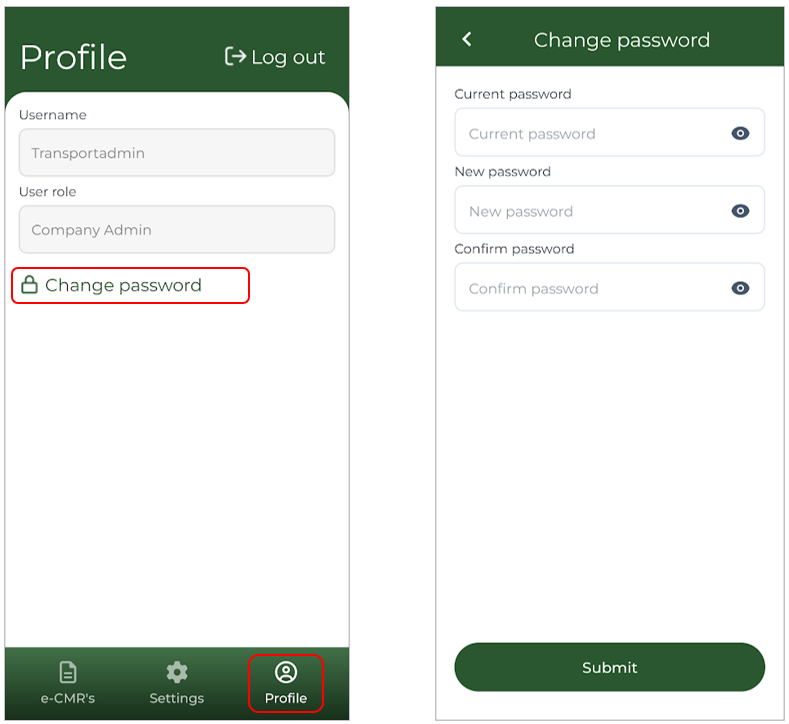
I am able to enter the application, but I do not have the authorisation to sign an e-CMR, how it this possible?
It is possible that you can log in to the app but are unable to sign an e-CMR. This depends on the access and permissions granted to your account.
For an overview of the different account types and their permissions, please visit the FAQ page under "General Explanation of the Different Roles."
If you encounter this issue, please contact your Company Admin. The Company Admin can adjust your permissions and ensure that you have the necessary access to perform the required actions.
Is it possible to sign for the shipper when the shipper is not present?
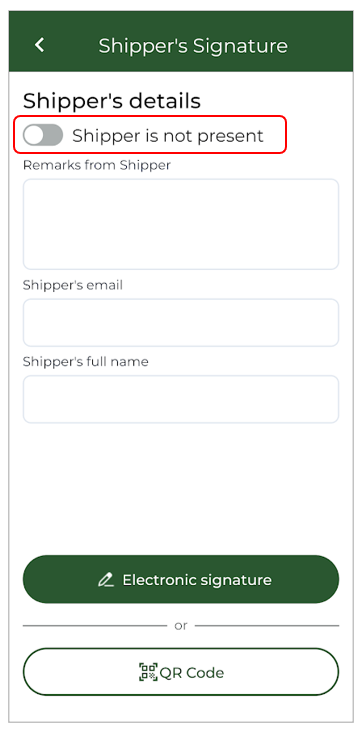
Yes, this is possible by using the shipper is not present toggle switch. ''shipper was not present'' will then also be plotted on the e-CMR
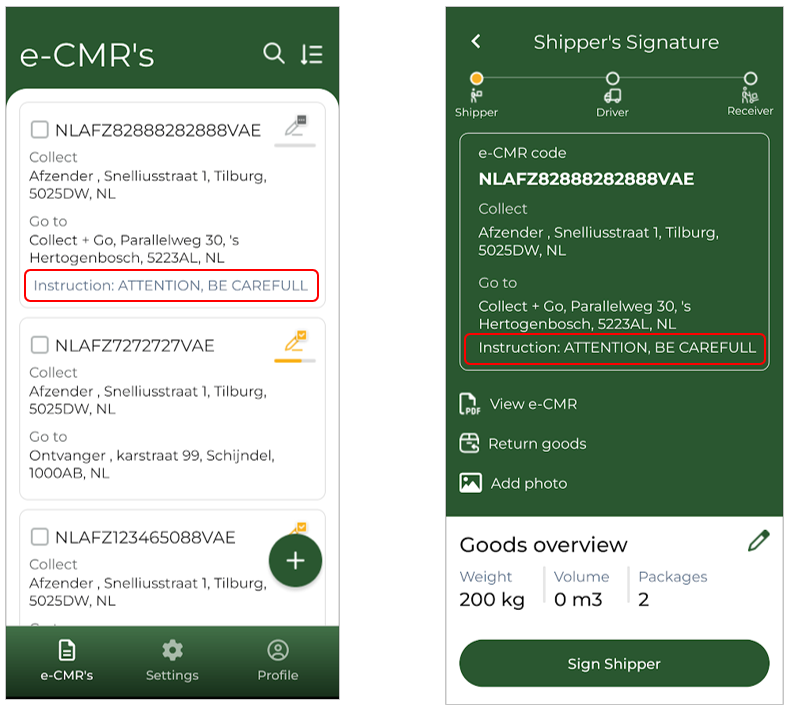
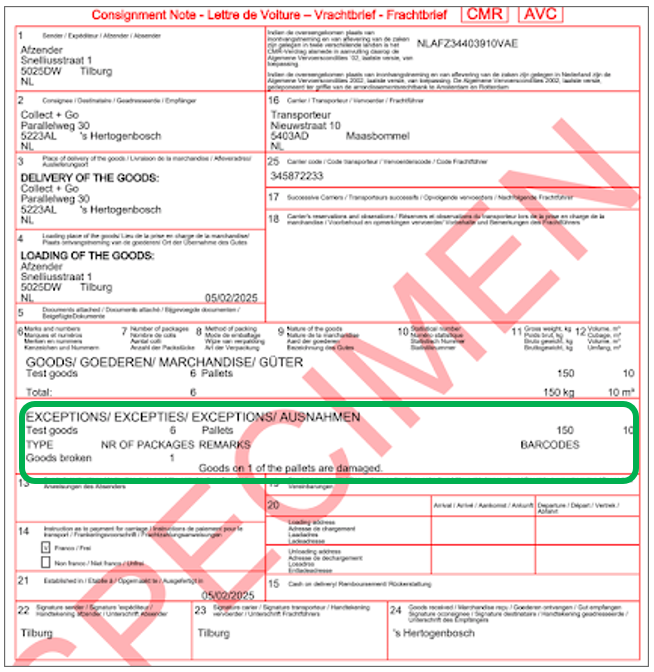
Remarks on the e-CMR
Senders and recipients can add comments to the e-CMR in the app. These comments may contain crucial information about the goods or unloading procedure and are important for the driver to review. They can be found in the areas circled in red in the image.