e-CMR process description
An e-CMR is a digital freight document that can be created through our Collect + Go system. An e-CMR contains important information about the transport, including details about the sender, consignee, place of delivery, loading place, carrier, goods, and signatures of all three parties involved. This valuable information makes the e-CMR a legally valuable file.
The diagram below provides an overview of the e-CMR process.

General tour of the portal
In this FAQ, the general tabs and symbols will be explained
The tabs -> At the top of the portal, five tabs are visible. In this general tour, it will be explained what can be done within these tabs.

- Dashboard Pro: This tab allows you to analyse your e-CMRs in detail. This way, you can gain a better understanding of your business processes.
- E-Documents: This is the home page of the portal. When you open the portal, you will land on this page by default. Through this tab, you can view all e-CMRs under your jurisdiction. This page allows you to create, edit, view, and sign e-CMRs, among other things. Everything related to e-CMRs can be found on this page.
- Users: This tab gives you the ability to view, edit, and create new users.
- Roles: This tab gives you the ability to view, edit, and create new roles.
- Organisations: This tab gives you the ability to create new organisations and edit existing organisations.
Meaning of the symbols View the e-CMR QR code. You can use this QR code to link directly to the e-CMR
 Add a comment within the Collect + Go portal to an e-CMR
 View the e-CMR details
 Edit the document details. This gives the possibility to modify information on the e-CMR itself.
 Delete the e-CMR, It is not possible to delete an e-CMR’s when it is already signed by one of the three parties due to legal obligations.
 View the e-CMR in PDF format.
Video (Long): Demonstration of how Collect + Go works
Detailed explanation of how Collect + Go works.
Video (Short): Demonstration of how Collect + Go works
Explanation of the Collect + Go happy flow
General explanation of the different roles
Different roles in the Collect + Go system have different possibilities. Some user roles have different permissions than others. In the following scheme is an overview of the different roles and the possibilities that are applicable to that user.
A brief description of the roles
Super admin -> Can create other organisations and create users within these organisations and see everything
Company admin -> Can create users and see everything within own organisation
Planner -> Can modify e-CMR’s and create drivers
Driver User -> May modify, view and sign off e-CMR’s in mobile app
Signing user -> May modify, view and sign off e-CMR's (limited) with QR and PIN code in the Collect + Go portal.
Truck role -> E-CMR’s can be linked to this user. This offers possibilities when the driver is variable but the truck is fixed. (more information @how to sign an e-CMR as a driver)

How to create new users within your organisation
Click on the “Users” tab in the Collect + Go portal.
Click on “Create User”.
Fill in the required information about the user in the pop-up screen that appears.
- Organisation: The organisation that the user is a part of. If this organisation has not yet been created, please create the organisation first. (Link to how to create an organisation.)
- Role: Choose a role from the drop-down menu.
- First Name: Fill in the first name of the user.
- Last Name: Fill in the last name of the user.
- Username: Enter a username of your choice for the user.
- Password: Enter a password of your choice for the user.
- Email: Fill in the email address of the user.
- Language: Select the preferred language of the user.
It is also possible to upload a standard signature for the user. This signature will be shown on the e-CMR. This field is optional and can always be changed after the user is created.
Make sure to provide the user with their login credentials after creating the account. The user can now log in using the credentials that you created.
How to modify and delete users

By using the pencil and trash can buttons, it is possible to change and delete existing users.
When clicking on the pencil button, the same screen as when creating the user will appear. It is possible to add, remove, or change information. By clicking on the trash can button, the user can be deleted.
NOTE: It is not possible to delete a user after the user started signing e-CMR’s in the system. This also applies for changing the organisation that is linked to the user. This organisation can only be deleted before a user starts signing e-CMR’s.
However, it is possible to change the role of a user after the user started signing e-CMR’s. This gives the possibility to extending rights or restricting them later on.
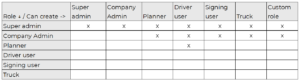
Which roles can create which roles
The scheme below provides an overview of which users, with specific roles, can create other users with particular roles. The column on the left lists the users and their roles, and the cross indicates which users with which roles they can create.
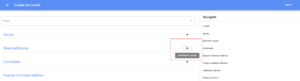
How to make a custom role (user)
In case one of the standard roles does not meet your needs, you can choose to create a custom role. The step-by-step plan below will guide you through this process.
Note: Some permissions are interdependent. For example, if you want to create an e-CMR or view organisations within the portal, you must have access to the portal itself. Ensure that the user receives this access to the portal so they can utilise the rest of the assigned permissions. Keep this in mind when selecting all the different permissions.
- Navigate to the “Roles” tab in the Collect + Go portal.
- Click on the green “Create Role” button.
- A pop-up screen will now appear.
- Fill in the organisation in which you want to use this custom role.
- Fill in a role name of your choice.
- Select the permissions you want to assign to this custom role. At the bottom of this section is an explanation of exactly what each permission means. Note: Some permissions are interdependent; keep this in mind when selecting the permissions.
- Click on the “Save” button at the bottom of the pop-up window.
- Now, go back to the “Users” tab within the Collect + Go portal and click on the “Create User” button.
- A pop-up window will appear.
- Select the relevant organisation and the custom role you just created.
- Fill in the other required information in the pop-up window to complete the user. See “how to create a new user within your organisation” (link).
- The custom user with custom permissions is now created.

How do I have an overview of the roles within my organisation
By clicking on the “Roles” tab at the top of the portal, you will get an overview of the roles within your organisation. On this page, you can search, filter, and view roles within the organisation. These roles need to be linked to a user before they become active. A role is simply a set of permissions that can be assigned to a user.
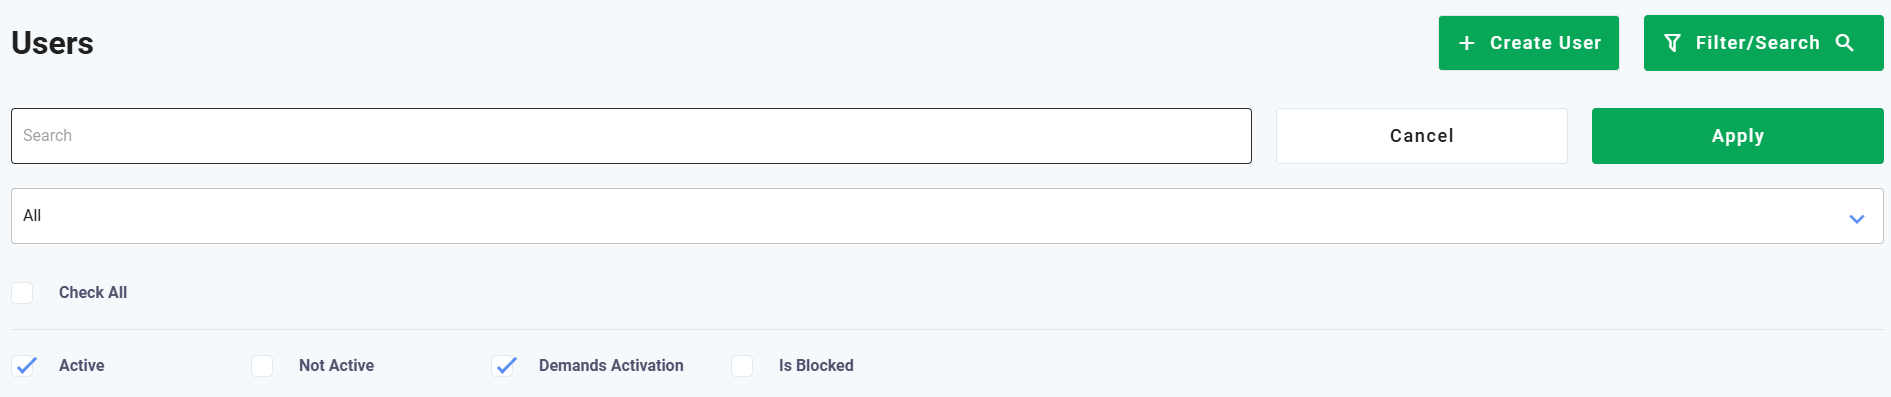
How do I have an overview of the users within my organisation
By clicking on the “Users” tab at the top of the portal, you will get an overview of the users within your organisation. On this page, you can search, filter, and view users within the organisation. All users are assigned a role that determines their access.
How to modify and delete roles
By using the pencil and trash can buttons, it is possible to change and delete existing roles. When clicking on the pencil button, the same screen as when creating the role will appear. You can add, remove, or change information. By clicking on the trash can button, the role can be deleted.
NOTE: It is not possible to delete a role after the user that is assigned to this role started signing e-CMR’s in the system.
How to create a new organisation
NOTE: Be aware that how you create the organisation is very important. The company name and address must match exactly how it appears on the e-CMR. If this is not the case, a new company will automatically be created and therefore the e-CMR will not fall under the existing company in the system. So pay close attention to capital letters and spaces to keep the overview in the system.
- Creating an organisation can only be done as a Super Admin
- Click on the “Organisations” tab in the Collect + Go portal
- Click on the green “Create Organisation” button
Stay on this tab for now, the other ones are for finetuning your organization and not for creating a new organization in the first place.

Fill in the necessary fields in the pop up;
- Name: Fill in the name of the new organisation
- Parent Organisation: Fill in the name of the organisation that this new organisation will be a part of. Check the “how does the hierarchy of the organisations work ” for more information about parent organisations.
- Country Code: Fill in the country code of the new organisation
- Organisation type: Select the type of the organisation from the dropdown menu.
- Carrier Code: Fill in the carrier code of the new organisation. This is the authorisation number of the carrier that identifies your company. This number is a mandatory field in the e-CMR later on.
The optional fields (not mandatory to create a new organisation)
- Postal code: The postal code of this new organisation
- Place: The city of this new organisation
- Street + nr: The address of this new organisation
- VAT: Unique number that identifies a taxable person (business)
- DUNS: Unique nine-digit number that is used to identify your organisation
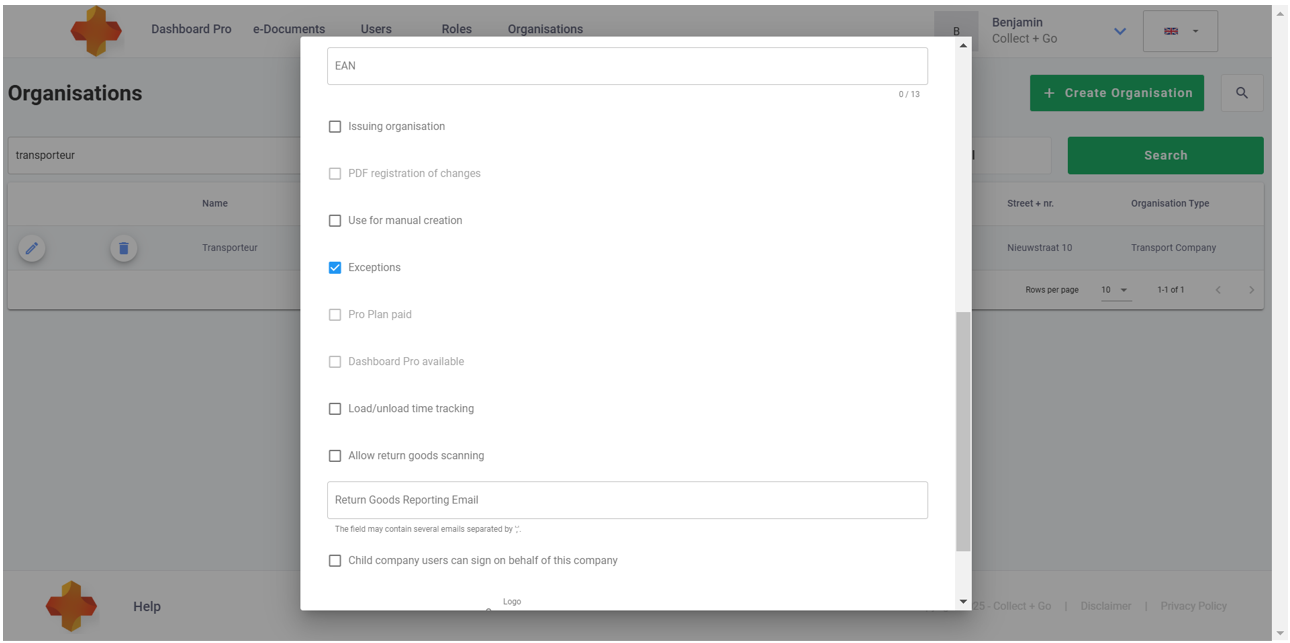
- EAN: Unique code that is used to identify organisations
Checkboxes
- Exceptions: Allows you to add preset comments for damaged or missing goods in the Collect + Go app. Check the chapter ''further setting up your organisation'' for more information
- Pro Plan paid: Not selectable, contact Collect + Go for more information
- Dashboard Pro Available: Not selectable, contact Collect + Go for more information
- Load / unload time tracking: Gives you the possibility track the loading and unloading time through the Collect + Go portal.
- Allow return goods scanning: Gives you the possibility to scan return goods in the app with a QR code, This makes it easier to add return goods for a driver user.
- Email: Here you can add emails addresses, when return goods are added, the addresses will get an email notification.
- Child company users can sign on behalf of this company: This feature allows an e-CMR to be signed by someone who was not initially assigned to do so. Therefore, when the e-CMR is then signed and it is seen that this user is under the main organisation that was actually supposed to sign this e-CMR is allowed to do so.
When everything is filled in, click on apply.
Your organisation is now created. You can find your organisation by using the search function on the organisation tab.
NOTE: Remember, the organisation's name and address must match the e-CMR exactly to avoid creating duplicate entries. Pay special attention to capital letters and spacing to keep the system organised.
How does the hierarchy of the organisations work?
There is a certain hierarchical structure in the organisations within the system. This will be explained here.
Sample situation:
A national supermarket is a customer of the Collect + Go system. This national supermarket has several stores in the Netherlands. All these stores are separate organisations within the Collect + Go system. These organisations fall under the Parent Organisation of the national holding company. Sometimes this supermarket also sends goods from shops abroad using e-CMR. They always do this with a regular carrier who also is a customer of Collect + Go. The driver uses the sign-on-glass feature to collect the required signatures. The recipient of these goods is always different and therefore not connected or familiar with e-CMR system from Collect + Go. So here, the driver collects the signatures using the app on the phone and the recipient has no further access the portal of Collect + Go. The hierarchical structure in this scenario is as follows:

Since the receiver is one-off, it is automatically created in the Collect + Go system. This does not include any other users as this organisation is only used as a delivery address in an e-CMR. Because the recipient’s organisation was created during the e-CMR setup by the store organisation, it falls under that store’s organisation in the hierarchy.
With the carrier this is different because they themselves are also customers of collect + Go. Because of this existing organisation, the carrier is also higher in the pyramid than the recipient. This is because this is a standalone organisation as opposed to the receiver which falls under the store’s organisation. This allows the store to look down into the receiver's organisation in the system but not into the carrier's organisation.
As a Super Admin, you can only create organisations that fall under your existing organisation. If a new standalone organisation needs to be created (e.g., for a new customer), only the Collect + Go team can set it up.
NOTE: If the store sends goods to this recipient again, the system will use the previously created recipient organisation rather than creating a new one. To avoid duplication, ensure that the recipient’s name and address match exactly. If the details do not match, the system will not recognise the existing recipient organisation, and a new one will be created. Entering names and addresses accurately helps maintain clarity and organisation within the system.
How to modify and delete organisations
Using the pencil and trash can icons, you can modify or delete existing organisations.
Clicking the pencil icon will bring up the same screen used to create the organisation, allowing you to add, remove, or change information. By clicking the trash can icon, the organisation can be deleted.
NOTE: Once a user within an organisation has started signing e-CMR’s, it is no longer possible to delete that organisation.
How to set up email notifications for e-CMR’s status updates
- Navigate to the “Organisations” tab within the Collect + Go portal
- Click on the edit button of an existing organisation.
- Once you click on the edit button, the same pop-up screen used when creating the organisation will appear. Select the 3rd tab labelled “Email Options” in this pop-up.
- On this page, you can create emails that are automatically send on when the driver signs a e-CMR, or when a receiver signs a e-CMR. The email can be send to the sender, carrier and / or receiver.
- By clicking on the “Help” button, a screen with variables will appear. You can use these to plot data from the e-CMR in the email. Copy these variables in your email and they will show the actual information from the e-CMR in your e-mail.
- When finished, click on apply on the bottom of the page. The email notification is now set up. We recommend to test your notification in the staging environment of Collect + Go.
Click here to see the detailed description of the automatic email. Here you can also see what an e-mail will look like in the end.
NOTE: The automatic email function will only work if the owner/submitter of the e-CMR has created this feature. Random participants in an e-CMR will not have access to this function. Also, do not forget to enter the relevant email addresses when creating the e-CMR. If no email addresses are provided, the email cannot be sent.
How to set up integrated notifications in your internal systems
By using the webhook function, it is possible to integrate notifications about e-CMR’s in internal systems. The notification is not sent via e-mail but directly to the system through the URL. You will be notified via the URL address when, for example, the e-CMR is signed by the sender. Because you receive this via URL, you can integrate this notification into your existing systems and, for example, let other internal actions depend on it. The setting field for this URL looks as follows:

Navigate to the edit button for an existing organisation and click on the 2nd tab in the pop-up, labelled “Webhook Settings”. The settings screen will appear.
- URL: Enter the web address where you want to receive notifications about e-CMR status updates.
- Authorisation: (Optional) Add a password to the information, ensuring that only authorised individuals can access it.
- Checkboxes: Select the events you want to receive notifications for (e.g., when an e-CMR is signed).
- e-CMR Change URL: This field allows you to access all available information about your e-CMRs. You can use this data to build a custom dashboard within your internal system with live data from Collect + Go. Contact the Collect + Go team to set up this feature.
- Swagger Notification Email: Enter your email address here to receive updates about the API connection with Collect + Go. You’ll be notified of any new developments or updates to the API.
Example of the webhook information
{"code": "NL534342323NEW", "status": "Closed", "timestamp": "6/7/2023 12:12:16 PM", "pdfLink": "https://collectgoapi.automatic.com.ua/pdf?code=NL534342323NEW&link=598173f272e4ba270321da45630971d8"}
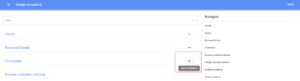
How to set up an exceptions list for the Collect + Go app
Watch the video or use the written instructions down below.
Configuring Predefined Exceptions for the e-CMR
It is possible to add predefined remarks to the e-CMR within the application. However, this must be set up in advance via the portal. The following instructions will guide you through the process.
Steps to Configure Predefined Exceptions:
- Navigate to the "Organisations" tab.
- Search for the company for which you want to configure the Exceptions List.
- Click the pen icon to edit the organisation settings.
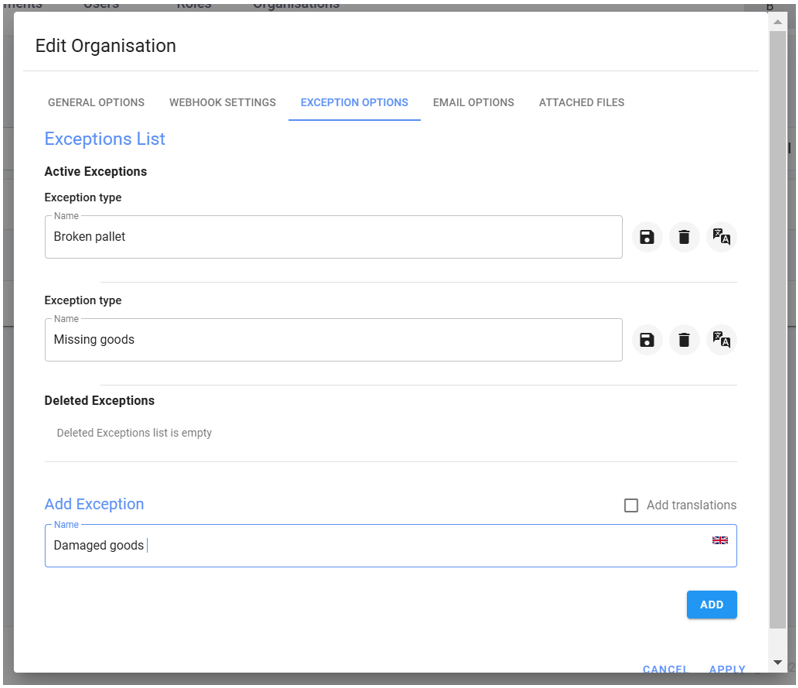
- Scroll down and check the box for "Exceptions".
- Scroll back up – a new tab called "Exceptions Options" will now appear.
- In this tab, you can add predefined exceptions. The driver using the app can then select from these predefined options when reporting an issue.
- Translations can also be added in this tab, ensuring that the predefined exceptions are available in multiple languages within the app.
Video instruction
Watch the video or read the written instructions about this topic down below.
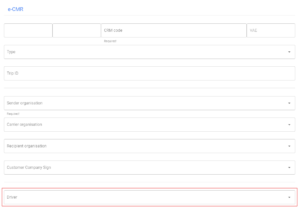
How to start creating an e-CMR manually
- Select the “e-Documents” tab in the top of the portal.
- Click on the green + button in the top right corner of the screen. (add e-CMR)
- A pop-up screen will appear. The e-CMR can now be created.
- In the screen that is seen below, certain data is required to create the e-CMR

CMR code: Enter a unique e-CMR code.
Type: A dropdown will appear with the following three options
- CMR / AVC -> Default setting.
- CMR -> Select when the transport is international
- AVC -> Select when the transport is within the Netherlands
Trip ID: Enter a unique Trip ID number
Sender organisation: Choose the sender organisation from the dropdown menu. If it has not yet been created in the system, do so first under the ‘organisations’ tab.
Carrier organisation: Choose the carrier organisation. If it has not yet been created in the system, do so first under the ‘organisations’ tab.
Recipient organisation: Choose the recipient organisation. If it has not yet been created in the system, do so first under the ‘organisations’ tab.
Customer company sign: Select the owner of the e-CMR. Who is creating the e-CMR?
Use this link to view the previous explanation in the previous version of the portal.
How to assign a driver
Assign the driver to the e-CMR
Use the circled dropdown to select a driver within the previously selected transport company. By linking the e-CMR to a driver, the driver can view the e-CMR and use it in the app or on-board computer. If no drivers are displayed in the dropdown, they must first be created in the ‘Users’ tab.
How to add goods
- Click on the "+ " to add goods:

2. The following screen will pop-up:

3. Fill in the fields and click on apply, the goods are now added.
Marks: Marks and numbers of the goods (required)
Packages number: Number of packages
Packing method: Method of packaging
Statistic number: Number connected to the goods
Gross weight: Total weight of the goods (either weight or volume is required)
Volume: Total volume of the goods (either weight or volume is required)
How to add return goods
Adding return goods is a possibility and not a mandatory field for creating an e-CMR
- Click on the + to add return goods.
2. The following screen will pop up:
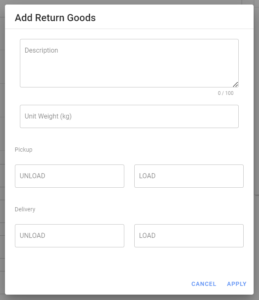
Description: Description of the return goods
Unit Weight (kg): Weight per unit (e.g., weight per pallet to be returned)
Pick-up: Enter the number of units to be unloaded or loaded at the pick-up location
Delivery: Enter the number of units to be unloaded or loaded at the delivery location
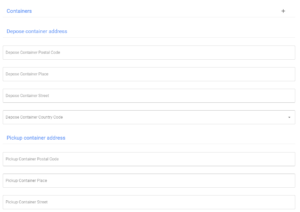
How to add container information
Adding container information is a possibility and not a mandatory field for creating an e-CMR.
In some cases, goods are transported by container. Through this function, the information about the container can also be included in the e-CMR.
- Click on + to add container information.
2. The following screen will pop-up:
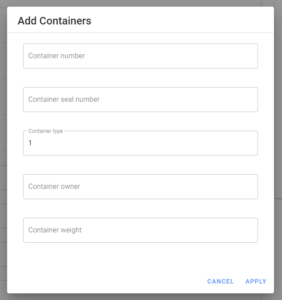
Container number: Unique container number
Container seal number: Number of the seal that is used on the container
Container type: Characteristics of the container (e.g. length)
Container owner: Owner of the container
Container weight: Weight of the container without goods
3. Additional information about the container can be provided using the fields below. The container may need to be collected or dropped off somewhere after transport. These fields can be used to enter this information.
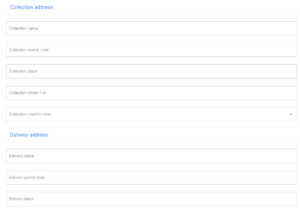
How to add different collection and delivery adresses
After selecting the sender, carrier and receiver, these fields are automatically populated with the available information linked to the profiles. If the pick-up or delivery addresses are different from the default addresses, they can be modified here.
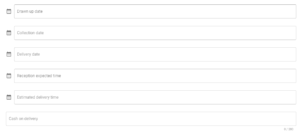
How to add additional information
How to use the additional information fields.
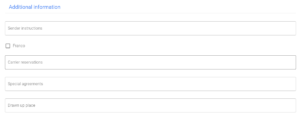
Sender Instructions: Possibility to give instructions to the carrier and recipient.
Franco check box: Check box if the sender pays for the transport
Carrier reservations: Possibility to make remarks that are applicable to the carrier.
Special agreements: Possibility to indicate particularities
Drawn up place: Location where the e-CMR is created
Drawn up date: Date of creation of the e-CMR (required)
Collection date: Date of pick-up (required)
Delivery date: Date of delivery (required)
Reception expected time: Expected pick-up time
Estimated delivery time: Expected delivery time
Cash on delivery: Possibility to make a remark about the payment process.
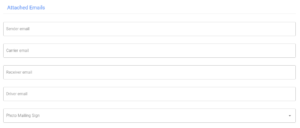
How to send an e-CMR by e-mail
It is possible to send the e-CMR by email to the relevant parties. Use the function below to do so.
By using the dropdown menu, you can choose to include any photos taken in this email as well.
How to add freight control
this answer will be on the page soon.
How to check the status of an e-CMR
The status of a e-CMR can be seen in the “e-Documents” tab. The status of the e-CMR is shown in the red circle

When you have entered all the information and clicked save, the status should be: ‘Ready for Signing’. If any information is still missing and the e-CMR is therefore not yet complete, the status will be ‘Created’. Only when the status is ‘Ready for Signing’ will the e-CMR be visible to the parties involved.
What are the different methods to sign an e-CMR
There are four possible ways to sign an e-CMR in the Collect + Go system. How a user will end up signing is figured out and set up in advanced.
- Automated signing.
- The signing process is automated and triggered by a certain event. For example, when the driver leaves the terrain after delivering the goods to the receiver, the e-CMR is automatically signed. This is caused by a trigger that was created by the driver that used his card at the gate of the receiver.
- Sign on glass
- The driver runs the Collect + Go software on a smartphone or board computer. The receiver or sender of the goods can sign the e-CMR by using the device of the driver.
- Sign by QR code
- The driver scans the unique QR code that belongs to the receiver or sender. When scanning this QR code with his smartphone or board computer, the e-CMR is signed by the receiver or sender.
- Sign by Pin code
The receiver or sender can sign the e-CMR with a Pin code trough the Collect + Go portal.- Receiver / sender logs in on the Collect + Go portal with a personal account
- Receiver / sender navigates to “e-Documents” tab.
- Receiver / sender selects the relevant e-CMR.
- Receiver / sender clicks on the “Sign” button
- A pop-up will appear, the receiver / sender can now fill in his password to sign the e-CMR.
- The e-CMR is now signed by the receiver / sender
The video below shows how to sign an e-CMR by Pin code through the portal:
Are the different signing methods available to everyone?
Not every type of user is able to sign in every way. The scheme down below gives an overview of signing methods per type of user.

Explanation of the default filter settings
When you open the Collect + Go portal, you will land on the e-Documents page. To ensure smooth functionality, several filters are applied by default. This approach prevents the system from loading all data at once, thereby enhancing user-friendliness. The default filters are as follows:
- Only e-CMRs with activity in the last two weeks are visible.
- e-CMRs are displayed in order of activity, with the most recent e-CMR at the top.
- Closed e-CMRs are not visible.
Users can modify these default filter settings as needed.
How to filter e-CMR’s
- Navigate to the “e-Documents” tab within the portal.
- Click on the green “filter / search” button
- A variety of features now emerge. Selecting these allows filtering by, for example, closed documents, documents ready to be signed or deleted documents. Besides that, a date range function appears to filter e-CMR’s in a certain date range.
- Select the desired criteria.
- Fill in a date range if applicable, do not forget to select to which the date should apply in the drop down menu called “period search”
- Click on apply, the e-CMR’s that meet the criteria will now appear on the screen.
How to search for e-CMR’s
It is possible to search for e-CMR’s within the Collect + Go portal. Follow the following steps:
- Navigate to the “e-Documents” tab within the portal.
- Click on the green “filter / search” button
- To search for e-CMR’s, you can use the search bar in the top of the screen. Click on “apply” after typing your conditions in the search bar.
- The e-CMR’s that are relevant to the search now appear on the screen
The search function provides results based on all the information available in the portal. However, it is not possible to search directly within the content of the e-CMR itself. To search effectively, use keywords such as company names, addresses, users, or e-CMR codes.
How to retrieve a e-CMR that is already closed
- Navigate to the “e-Documents” tab within the portal.
- Click on the green “filter / search” button
- Check the box “closed” within the filter menu.
- Click on apply, the e-CMR’s that are closed will now appear on the screen.
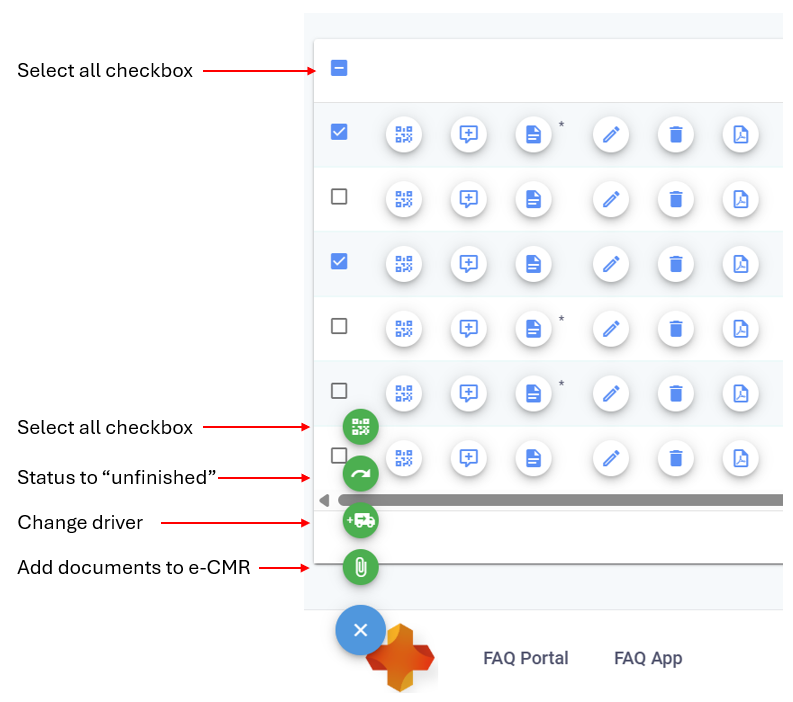
How to use the multi-select functionality for e-CMRs
On the far left in the e-Documents page, you will find checkboxes that allow you to select multiple e-CMRs at once. These checkboxes offer several options for working with e-CMRs:
- Displaying the QR code of the e-CMR.
- Setting the status of an e-CMR to "unfinished." This can be useful when an e-CMR has not been completed or used, but you still want to remove it from your overview without deleting it entirely.
- Changing the assigned driver.
- Adding documents.
All of the above actions can be performed on multiple e-CMRs simultaneously by selecting more than one at a time.
TIP: If you wish to perform an action on many e-CMRs at once, you can first use the filter functions to display only the relevant e-CMRs. Once you have the desired selection on screen, you can use the "Select All" function to select all displayed e-CMRs.
Signed an e-CMR but the signature is not visible in the e-CMR
This issue can be caused by several factors.
One possibility is that the e-CMR was signed while it was not in the correct state. If the e-CMR does not contain all the required information, it is not ready to be signed. If it is signed in this incomplete state, the signature will not be valid due to the missing information and will not be saved. Another possibility is simply forgetting to save the signature after signing.
How can is see the status of an e-CMR?
The status of a e-CMR can be seen in the “e-Documents” tab. The status of the e-CMR is shown in the red circle.
Why is it not possible to delete an organisation or user?
It is not possible to delete organisations or users that involved in existing e-CMR’s. This limitation is due to the legal traceability of e-CMR’s. Deleting organisations or users is only possible before they are involved in e-CMR’s.
Why is it not possible to delete a completed e-CMR?
Due to the legal archiving obligation, it is not possible to delete a completed e-CMR.
E-CMR’s are not visible in the portal, what can be the problem?
There are two main reasons this error might occur:
- Company Name and Address Mismatch: The name and address of the company on the e-CMR must match exactly for it to appear in the portal. If there is any discrepancy, such as a spelling mistake, a new company will be created automatically. As a result, you won’t be able to view the e-CMR because the newly created company will not be under your jurisdiction. It’s crucial to ensure that the company name and address are accurate when creating new e-CMR’s.
- Closed e-CMR: The e-CMR might already be closed, making it no longer directly visible in the portal. To find it, you’ll need to filter for closed e-CMR’s. A detailed guide on how to filter and search for an e-CMR can be found under “How to filter and search for an e-CMR.”
Is it possible to change the rights of a user in the portal later on?
Yes it is possible to change the rights of a user later on. You can expand them or restrict them at a later date.